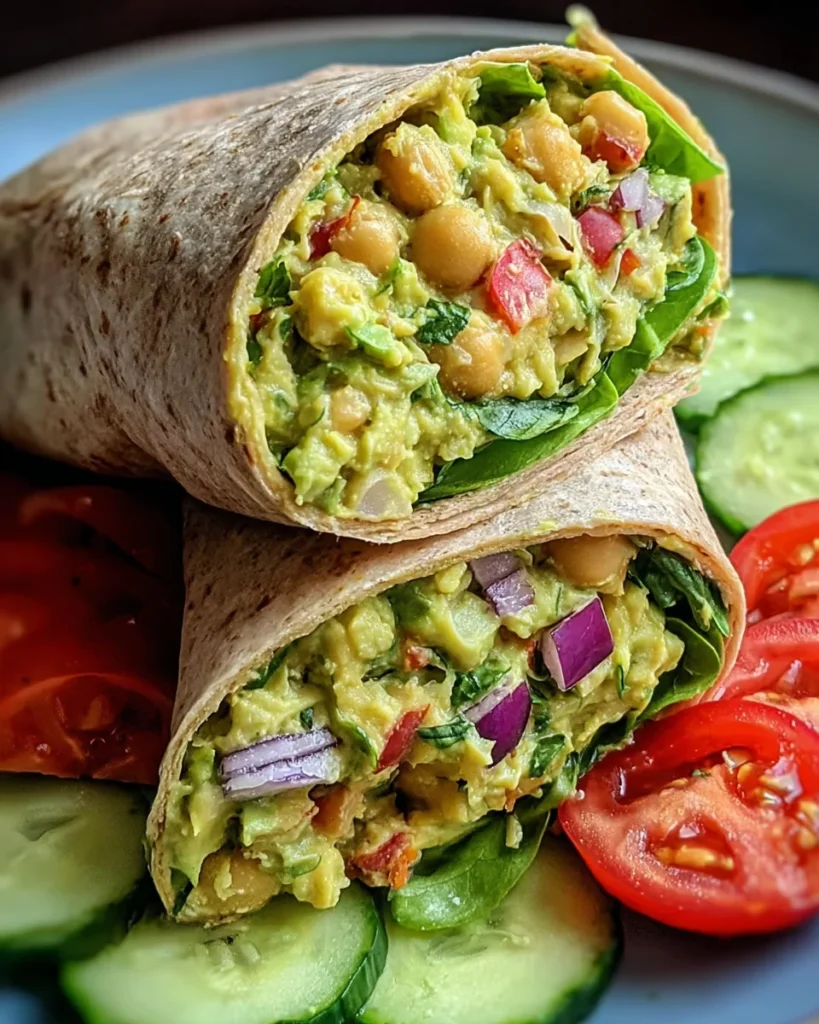
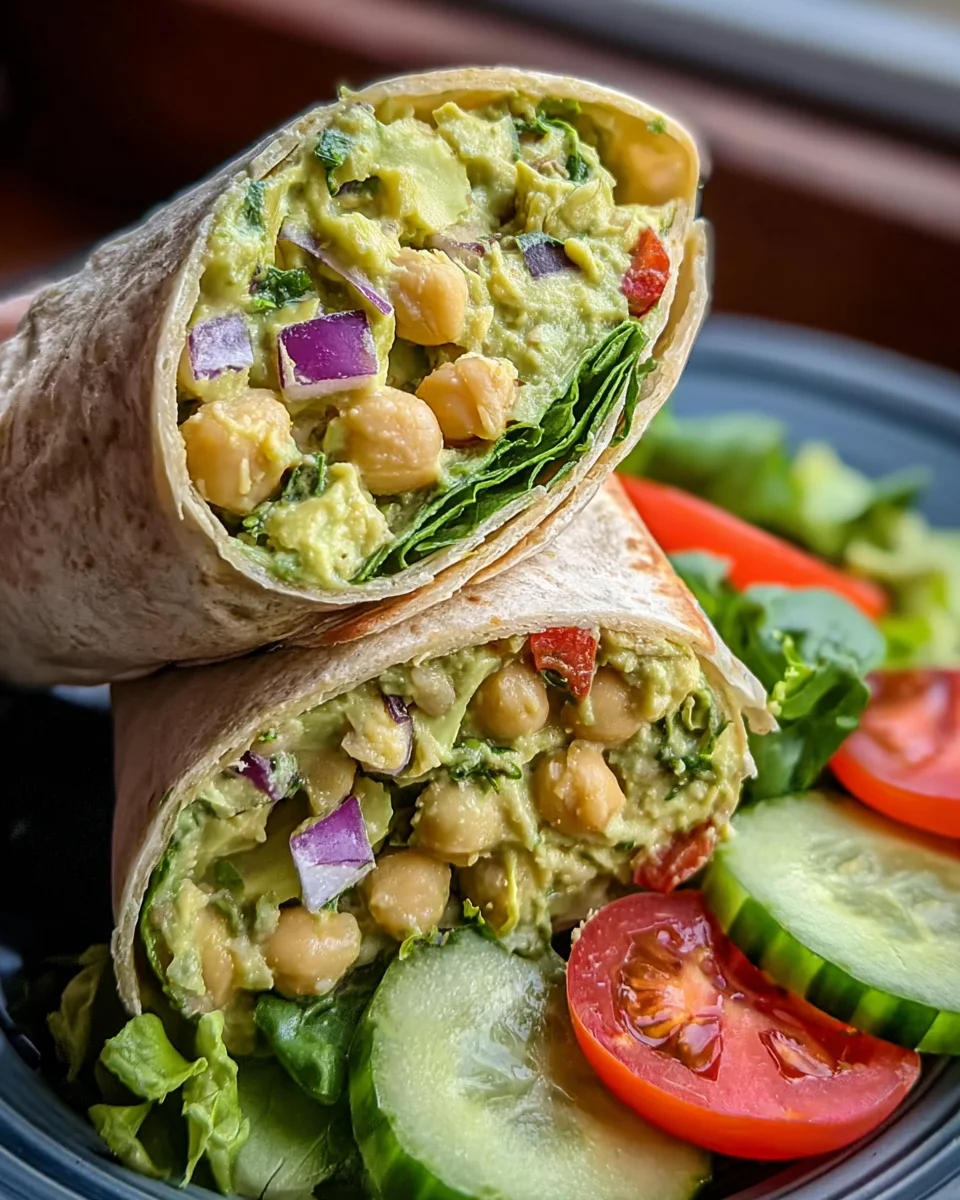
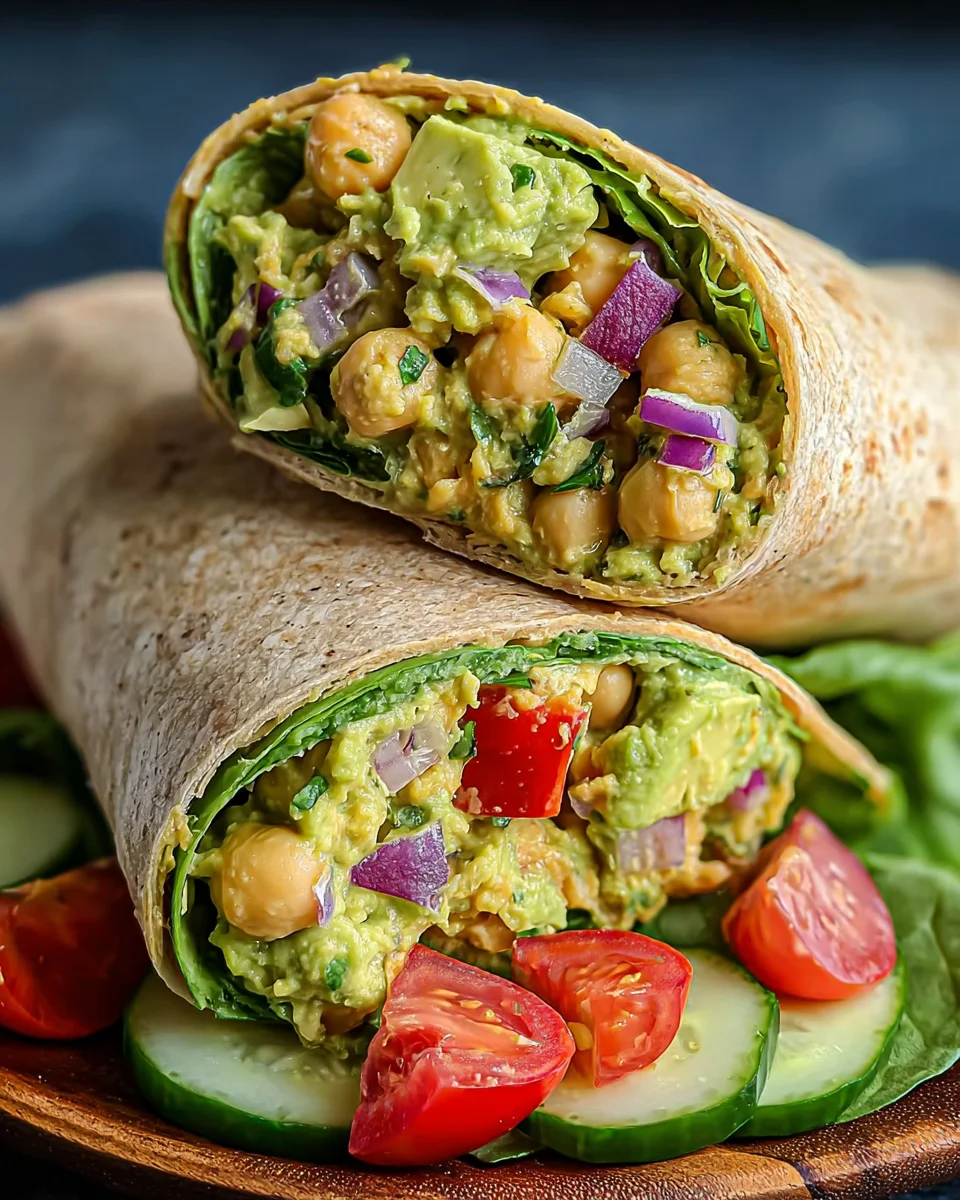
Creamy, satisfying, and incredibly portable—these Avocado Chickpea Salad Wraps prove lunch can be absolutely crave-worthy and nourishing. Perfect for picnics, lunch boxes, or a quick meal at home, these wraps are not just healthy but also bursting with flavor. With their vibrant ingredients and simplicity, they are sure to become a favorite in your meal rotation.
Why You’ll Love This Recipe
- Quick to Prepare: With just 15 minutes of prep time, you can whip up a delicious and nutritious meal in no time.
- Packed with Flavor: The combination of creamy avocado and zesty lemon juice creates a refreshing taste that is hard to resist.
- Versatile Ingredients: Customize your wraps with any veggies you love, making it easy to tailor them to your taste preferences.
- Meal Prep Friendly: The filling keeps well in the fridge for two days, perfect for planning ahead and enjoying throughout the week.
- Plant-Based Goodness: This recipe is vegan-friendly and provides a satisfying dose of protein from chickpeas.
Tools and Preparation
Before diving into this delightful recipe, gather your tools. Having the right equipment makes the process smoother and more enjoyable.
Essential Tools and Equipment
- Mixing bowl
- Fork or potato masher
- Knife
- Cutting board
- Measuring spoons
- Tortilla warmer or microwave-safe plate
Importance of Each Tool
- Mixing bowl: A large bowl is essential for combining all your ingredients without making a mess.
- Fork or potato masher: These tools help achieve the perfect chunky-creamy texture in the chickpea-avocado mixture.
- Knife: A sharp knife ensures even cuts when prepping your fresh veggies.
- Cutting board: Provides a stable surface for chopping ingredients safely.
Ingredients
Creamy, satisfying, and incredibly portable—these plant-based wraps prove lunch can be absolutely crave-worthy and nourishing.
Prep Time: 15 minutes | Resting Time: 10 minutes | Total Time: 25 minutes | Servings: 4-6 wraps
Ingredients:
– 2 cans (15 oz each) chickpeas, drained and rinsed well
– 2 ripe avocados, mashed (naturally vegan and perfect here)
– 2 celery stalks, finely diced
– 1/4 red onion, finely diced
– 1/4 cup fresh parsley, chopped
– 2 tablespoons fresh dill, chopped (don’t skip this flavor booster)
– 3 tablespoons fresh lemon juice (about 1 lemon)
– 2 tablespoons dijon mustard
– 1 teaspoon sea salt
– 1/2 teaspoon black pepper
– Optional: 2 tablespoons hemp hearts for extra nutrition
– 4-6 large tortillas or wraps (whole wheat or spinach work beautifully)
– Fresh lettuce or spinach leaves
– Sliced cucumber
– Sliced tomatoes
– Sprouts or microgreens (optional but fancy)
How to Make Avocado Chickpea Salad Wrap
Step 1: Rinse the Chickpeas
Rinse chickpeas really well under cold water until the water runs clear—this removes that canned taste and makes them absolutely fresh-tasting.
Step 2: Mash the Avocado and Chickpeas
In a large bowl, add chickpeas and ripe avocados. Using a fork or potato masher, mash together until you get a chunky-creamy texture that looks absolutely gorgeous—don’t over-mash.
Step 3: Add Fresh Veggies
Add diced celery, red onion, fresh parsley, and dill to the mashed mixture until everything looks colorful and aromatic.
Step 4: Season the Mixture
Stir in lemon juice, dijon mustard, salt, and pepper, folding gently until well combined and beautifully seasoned.
Step 5: Let It Rest
Let the filling rest for 10 minutes to allow flavors to meld—this step makes all the difference in the final taste.
Step 6: Prepare Tortillas
Warm tortillas slightly in a dry pan or microwave to make them more pliable and easier to roll without tearing.
Step 7: Fill Each Tortilla
Spread about 1/2 cup of chickpea filling down the center of each tortilla, leaving space at the edges for rolling.
Step 8: Add Vegetables
Add fresh lettuce, cucumber slices, tomatoes, and any other vegetables you love until it looks absolutely stunning.
Step 9: Roll Your Wraps
Roll tightly from bottom to top, tucking in sides as you go to create a perfect, professional-looking wrap.
Step 10: Serve
Cut in half diagonally and serve immediately or wrap in foil for the perfect portable meal.
Enjoy your delicious Avocado Chickpea Salad Wraps!
How to Serve Avocado Chickpea Salad Wrap
Serving your Avocado Chickpea Salad Wrap can elevate your meal experience. Here are some delicious ways to enjoy these wraps that will make lunchtime exciting.
For a Quick Lunch
- Use a large tortilla to create a satisfying wrap that is easy to grab and go.
- Pair with carrot sticks for a crunchy, refreshing side.
At a Picnic
- Pack the wraps in foil to keep them fresh and portable.
- Include some fruit skewers for a sweet contrast.
As Part of a Meal Prep
- Make multiple wraps ahead of time and store them in the fridge.
- Add some healthy snacks like hummus and veggie sticks for a complete meal.
With Dipping Sauces
- Serve with tzatziki or ranch dressing for extra flavor.
- A spicy sriracha mayonnaise could add a nice kick!
For Kids’ Lunchboxes
- Cut the wraps into smaller pieces for easier handling.
- Include some apple slices or cheese cubes for variety.
How to Perfect Avocado Chickpea Salad Wrap
Creating the perfect Avocado Chickpea Salad Wrap requires attention to detail. Here are some tips to ensure your wraps are always delicious.
- Use ripe avocados: Choose avocados that yield slightly when pressed; this guarantees creaminess and flavor.
- Mash gently: Aim for a chunky texture, which adds bite and prevents the filling from becoming mushy.
- Let it rest: Allowing the mixture to sit for 10 minutes enhances the overall flavor profile.
- Warm tortillas: Slightly warming tortillas makes them more pliable, reducing tears while rolling.
- Customize fillings: Feel free to add your favorite veggies or proteins, enhancing nutrition while keeping it interesting.
- Store properly: Wrap assembled wraps in foil to keep them fresh longer, especially for on-the-go meals.
Best Side Dishes for Avocado Chickpea Salad Wrap
Pairing side dishes with your Avocado Chickpea Salad Wrap can enhance your dining experience. Here’s a list of complementary sides that make great companions.
- Fresh Fruit Salad: A mix of seasonal fruits provides sweetness and freshness. Toss together melons, berries, and citrus for brightness.
- Chips and Salsa: Crunchy tortilla chips paired with vibrant salsa add an enjoyable crunch and zest to your meal.
- Cucumber Salad: Toss sliced cucumbers with vinegar, herbs, and spices for a refreshing side that complements the wrap’s flavors.
- Roasted Sweet Potatoes: These offer natural sweetness and hearty texture; roasting brings out their best flavors.
- Coleslaw: A tangy coleslaw adds crunch and balances the creaminess of the wrap perfectly.
- Vegetable Sticks with Hummus: Carrots, celery, and bell peppers served with hummus create a nutritious snack full of color and flavor.
Common Mistakes to Avoid
When preparing your Avocado Chickpea Salad Wrap, it’s easy to make a few common errors. Here are some mistakes to watch out for:
- Over-mashing the chickpeas: This can lead to a paste-like filling. Aim for a chunky texture for the best taste and satisfaction.
- Skipping the resting time: Allowing the filling to rest for 10 minutes helps meld the flavors. Don’t rush this important step!
- Using stale or dry wraps: Ensure your tortillas are fresh and pliable. Warming them slightly makes rolling easier and prevents tearing.
- Neglecting seasoning adjustments: Taste your filling before serving; you may need more salt, pepper, or lemon juice for balance.
- Ignoring customization: Feel free to add other veggies or spices. This recipe is versatile, so make it your own!
Storage & Reheating Instructions
Refrigerator Storage
- Store in an airtight container for up to 2 days.
- Keep the filling separate from the wraps if possible to avoid sogginess.
Freezing Avocado Chickpea Salad Wrap
- Wrap tightly in plastic wrap or foil before placing in a freezer-safe bag.
- These wraps can be frozen for up to 1 month.
Reheating Avocado Chickpea Salad Wrap
- Oven: Preheat to 350°F (175°C). Wrap in foil and heat for about 10-15 minutes until warmed through.
- Microwave: Place on a microwave-safe plate and heat on high for 30-60 seconds, checking frequently.
- Stovetop: Heat in a skillet over medium heat for about 5 minutes on each side until warm.
Frequently Asked Questions
If you’re curious about the Avocado Chickpea Salad Wrap, here are some common questions:
What can I add to my Avocado Chickpea Salad Wrap?
You can customize this wrap with extra veggies like bell peppers, carrots, or even avocado slices for added creaminess.
How do I keep my wraps from getting soggy?
Store the filling and wraps separately until you’re ready to eat or use sturdier ingredients like lettuce as a barrier.
Can I make these wraps ahead of time?
Absolutely! Prepare the filling in advance and store it in the fridge. Assemble the wraps just before serving for freshness.
Are Avocado Chickpea Salad Wraps healthy?
Yes! They are packed with protein, healthy fats, and fiber, making them a nutritious choice for any meal.
What variations can I try with this recipe?
Feel free to experiment with different spices or herbs! Adding ingredients like cumin or smoked paprika can bring new flavors to your wraps.
Final Thoughts
The Avocado Chickpea Salad Wrap is not only delicious but also incredibly versatile. Its creamy texture and fresh flavors make it perfect for lunch boxes, picnics, or quick meals at home. You can easily customize it with your favorite vegetables or spices, ensuring every bite is delightful. Give this recipe a try today!
Avocado Chickpea Salad Wraps
Avocado Chickpea Salad Wraps are the ultimate solution for a quick and nutritious meal that doesn’t compromise on flavor. These vibrant, plant-based wraps combine creamy avocados with protein-packed chickpeas, fresh veggies, and zesty seasonings to create a satisfying lunch option or picnic favorite. With just 15 minutes of prep time, you can whip up a delicious filling that not only tastes great but is also packed with healthy nutrients. Perfect for meal prep, these wraps stay fresh in the fridge for days and can easily be customized with your favorite vegetables. Enjoy them as they are or pair them with a tangy dipping sauce for an extra kick!
- Prep Time: 15 minutes
- Cook Time: 0 minutes
- Total Time: 15 minutes
- Yield: Serves 4-6 wraps
- Category: Lunch
- Method: No cooking required
- Cuisine: Vegan
Ingredients
- 2 cans (15 oz each) chickpeas, drained and rinsed well
- 2 ripe avocados, mashed
- 2 celery stalks, finely diced
- 1/4 red onion, finely diced
- 1/4 cup fresh parsley, chopped
- 2 tablespoons fresh dill, chopped
- 3 tablespoons fresh lemon juice
- 2 tablespoons dijon mustard
- 1 teaspoon sea salt
- 1/2 teaspoon black pepper
- Optional: 2 tablespoons hemp hearts
- 4-6 large tortillas or wraps
- Fresh lettuce or spinach leaves
- Sliced cucumber
- Sliced tomatoes
- Sprouts or microgreens (optional)
Instructions
- Rinse chickpeas under cold water until clear.
- In a large bowl, mash together chickpeas and avocados until chunky-creamy.
- Stir in diced celery, red onion, parsley, and dill.
- Add lemon juice, dijon mustard, salt, and pepper; mix gently.
- Let the mixture rest for 10 minutes to allow flavors to meld.
- Warm tortillas slightly for easier rolling.
- Spread filling down each tortilla center and add fresh veggies.
- Roll tightly from bottom to top, tucking in sides as you go.
- Cut in half diagonally and serve immediately or wrap in foil.
Nutrition
- Serving Size: 1 wrap (approximately 150g)
- Calories: 320
- Sugar: 2g
- Sodium: 400mg
- Fat: 14g
- Saturated Fat: 2g
- Unsaturated Fat: 9g
- Trans Fat: 0g
- Carbohydrates: 43g
- Fiber: 12g
- Protein: 10g
- Cholesterol: 0mg